Posts filed under ‘Tech Stuff’
How Not To Pack Gear
 For our 15th year company outing, we were headed off to beautiful Dos Palmas Beach Resort and Spa in Palawan. And my camera gear couldn’t have been more ready. The timing was excellent: the 18-135mm lenses that I bought used from a friend as well as the MB-D200 Battery Grip was hand-delivered from Japan just the day before our outing, as well as a DicaPac WP-S10 DSLR underwater pack I had ordered and delivered to my office.
Here is the official list of gear I brought with me:
Continue reading at the new GeekMadness
- Nikon D200
- Nikon MB-D200 battery grip
- Nikon SB-600 Flash
- 18-135mm lens
- 28-85mm lens
- 70-300 lens
- DicaPac WP-S10 Underwater DSLR pack
- Cokin P-series filter holder
- Cokin 58mm adapter ring
- Cokin 62mm adapter ring
- Cokin Circular Polarizer
- Cokin 81B filter
- Cokin Gradual Grey filter
- Slik Able-300EX Tripod
- Kohjinsha SH6 laptop
- Okion portable optical mouse
- Nintendo DS (Ok, maybe this doesn’t count with photography, but it’s still tech)
- Chargers
Note: If you’re wondering why I still brought with me my 28-85mm, it’s because I didn’t have an adapter ring for the 67mm diameter 18-135mm lens.
I had so much gear with me, that in fact I think I had more gear than clothes! Yeah! All these in tow, camera gear…check. Batteries fully-charged…check. Clothes…check. All set to go to beautiful Dos Palmas!
Now for all of you out there, here’s Piece of Advice #1: If you’re going out on a trip like this with this much gear, I advise you to make a checklist; things can get pretty hectic when you’re getting your gear ready and rushing to the airport. In my case, I didn’t have one. And I forgot probably the most important thing in my gear…
…my fully-charged D200 battery!
My first realization of this fact was in the boarding area, when my boss asked me to take a picture, and I gladly obliged. Bringing out my camera, I wondered for a second why the LCD didn’t show the available shots left (it displays even when the D200 is turned off). And I just bumped my head into the D200 (don’t worry, the D200 is tougher than my head), and muttered “ass…” All of those camera gear, and no SLR to use them with!
On the plane, I rejoiced in the fact when I remembered that I brought the MS-D200 battery holder that came with the battery grip. What this savior did was to allow me to put 6 AA batteries into the battery grip as an emergency power source. I found a sari-sari store at the dock just before leaving for Dos Palmas island (after the bus ride from the airport at Puerto Princesa) and bought a couple of batteries for P18 a piece. Piece of Advice #2: Eveready General Purpose batteries (color blue) WILL NOT power up your D200! Even with a fresh batch, they will display as battery low. At the Dos Palmas Tabu-An (their souvenir shop), I bought more alkalines, this time Kodak batteries meant to be used for cameras.
Piece of Advice #3: When operating with limited battery supply, turn off auto-focus, flash, and keep the LCD preview to a minimum. I also turned off the grid display, for good measure, but I don’t think it mattered at all. The Kodaks lasted for around 25 shots. At P270 for 6, it wasn’t going cheap…
Much later, desperate for power, I thought, flash is useless without a camera to use them with. So I salvaged the 4 NiMHs in my SB-600 and borrowed 2 more from a friend. Piece of Advice #4: NiMHs can smoke alkalines, any kind, any day. The NiMHs could shoot through 2 2GB CF cards and still keep on going (I’m still draining them right now, trying to figure out continuous flash shooting).
Much, much later, I realized that the “drained” Kodaks could still power my flash! Doh!
Anyway, head over to http://www.jplui.com/photos/DosPalmas for the vacation pictures that I managed to take. Enjoy!
AOC LCD Monitor With PIP TV
 I just got a new toy to add to my room! I have been looking out to buy a flat-panel LCD monitor for my desktop. My aging CRT monitor’s plug was already falling apart and the monitor was displaying pink. While I could breath a little bit more life into it by repairing it, I figured it was time to move up.
 I’ve been looking around for a flat-panel monitor for 6 months, but since I had a long-term assignment in Japan, it would be gathering dust and cobwebs if I had bought one last year. And thank goodness I didn’t! My initial choice was a 19-inch widescreen Samsung. But when I was already about to get one, the store guy recommended that I get this AOC instead, since the price difference was minimal.
 Aside from the 19-inch widescreen goodness, the AOC also had a built-in TV tuner and your standard-fare RCA and S-Video inputs, as well as DVI input for a full HDTV experience (if your hardware has it). Of course, it comes with a remote control.
After trying it out at the store, I was pretty much convinced. After all, I didn’t have a TV in my room (my old TV was brought down to the living room). So now, not only do I have a space-saving flat-panel monitor for my PC, I can also play with my Wii from the comfort of my room! Plus the fact that I could pay for it slowly for 6 months through my credit card.
Another cool thing is the picture-in-picture (PIP) function; it allows me to use it as a monitor AND watch TV at the same time (click picture to enlarge)! Sweet.
Update: Today, less than 2 weeks later, my girlfriend got herself one of her own.:)


Say Hello To Koji
 I saw a Kohjinsha SH6KP10A for only Y40K in Nipponbashi! I have seen the Kohjinsha quite a few times before, but never really paid attention because it was a local brand and was as expensive as a more powerful, albeit larger laptop. So coming home, I decided to do a little forward research on the Kohjinsha, specifically on Linux support. It only had an Intel A100 600Mhz processor (for reasons unknown to me, it’s faster than my 2.4Ghz main laptop), although it did have an Intel 945 GPU, which was perfect for 3D in Linux. If this thing could run a Vista, it would be quite fast when running Ubuntu. I compared the price vs. feature set with other UMPCs. TheSamsung Q1 was another favorite of Ubuntu users, but as it did not have a real keyboard (I need to be able to work on it; the optional keyboard attachment made it not so ultra-mobile, yuck). Searching the Ubuntu Forums yielded few, but very promising and helpful results. Checking them out, I found a few owners of Kohjinshas getting Gutsy on their UMPCs.
It was only 40K yen if you were going to get a Yahoo!BB subscription with it. But at 60K, it was still a bargain, since it was only 6mos used and at half the price of a new one. And I got myself one last weekend.
 Taking it home, what was my first impression? First of all, it was preloaded with Vista, and instead of a recovery disc it had a 4GB recovery partition. I had to test all the hardware first to see if everything was A-Ok. Touch screen worked, webcam worked, the controls beside the screen (a lot of ’em: D-pad, track pointer, launcher, shutter, rotation, enter, brightnes. scroll keys. left and right mouse buttons), webcam, TV tuner, bluetooth and WiFi, all working perfectly. And you had no less than 3 ways to control your pointer: via the touch pad, the thumb pointer, and touch screen. As for text input, well you had the physical keyboard when you really need the typing speed, or you can use the touch screen.
While it still had Vista, I decided to do a quick speed comparison test. Nothing fancy, just a quick test to see which OS would allow me to work more before I had to get off the train at the station. In short, boot times.
Here are the results:
Windows Vista Home Basic Startup time:
1:10.03 – Time to welcome screen
1:49.83 – Time to desktop display
4:06.85 – Time to finish loading everything
Ubuntu Gutsy LiveCD startup time:
0:22.21 – Time to LiveCD menu
3:02.19 – Time to opening tune
4:26.33 – Time to finish loading everything
Vista was able to boot in just a little over 4 minutes (about the time it takes for a train to get to the next station) and 20 seconds faster than Ubuntu. That’s swell, until you consider the fact that IT WAS A LIVECD! For those not in the know, a LiveCD basically allows you to run an OS without installing on your computer. That’s right, that 4 minute Vista on my fast hard drive barely beat Ubuntu running off a CD drive! Hey, I wanted a fair fight, so I had to handicap Ubuntu..<snicker>
 Alright, so what are the real comparison figures for Ubuntu and Vista when both are installed in the hard disk?
Ubuntu Gutsy LiveCD startup time:
1:01.44 – Time to Login Screen
1:10.41 – Time to opening tune
1:35.58 – Time to desktop display
1:39.49 – Time to finish loading everything
You could argue that the Vista desktop already appears at about 1:50, but you just can’t do anything with it yet for another 30 seconds, where you can *technically* do something e.g. click a button/menu, just don’t expect your computer to respond well.
 So Vista was out and Ubuntu was in, and without needing to install any drivers at all, the CF and SD card reader, controls beside the screen, the webcam, 3D card, sound, and most everything worked out-of-the-box and without my intervention. And from the info in the Ubuntu Forums thread I had found earlier, I was able to get Koji up to speed.
 So right now, I can type away on the train(where I wrote most of this post’s content yesterday on the train to Kyoto). Heck, I could do away with the typing altogether and just scribble away with Cellwriter.
I don’t really need to say this but I’m one very, very proud Ubuntu-powered Kohjinsha owner!
New Photo Gear Page
I’ve added a new page to this blog, the Photo Gear page. Over there, I’ve written some insights and opinions on what type of gear you’ll need to start off shooting. Nothing specific, really, just what kind of gear, what to look for, etc. Hopefully, you’ll find something useful there. I’ve also upped some of my own gear over there in the form of photos. If you wanna know more about them, just click on the thumbnails. I’ll be uploading more of ’em as soon as I get around to taking shots of them, so check back often. That’s it for now, need to rush to my day job. Till next post!
Techno Tokyo Trip (Part 3)
As I mentioned last post, I bought myself a real goodie from Akihabara. Something I’ve long been working for so it was high time to reward myself with this, ehem, investment.


Ta da! Introducing the D200 from Nikon’s prosumer line. This hefty monster feels right in my hands, and the magnesium alloy body really feels solid, sturdy and can take a real beating before giving up the ghost.
I was able to pick one up from Sofmap in Akihabara second-hand for a price almost half off of a tag price on the cheap price range (Hint: brand new body-only price is around Y160K). So why did I pick up a 2nd hand D200 instead of a brand new D40x which I could get for even less, lens included (I think I could have also afforded the D80 kit as well)?
I was not looking for an entry-level camera. I’ve had prior practice on film with my trusty, if not comparitively simplistic, F55D film camera. So, while I knew that a ton of features do not a good picture make, at the very least I needed camera that can keep up with my needs.
The D40 was also much more pickier with lenses, since their lens mounts do not have the built-in focus drive motors, and since I had a few lenses already, I did not want to put them out of use and invest in new AF-S and AF-I lenses. And while I often do manual focus, you will have to love the autofocus speed and control you get with the D200’s 11-area TTL focus.
The D200’s built-in flash can also be used as a commander unit for use with Nikon’s Creative Lighting System. In other words, you can control an SB-600/SB-800 flash remotely without the need for additional equipment, save for the flash unit itself of course. The only other cameras that can do this is the D70, but it was already aging and has a smaller LCD screen.

So why buy a 2-year old product second-hand? Simply put, it gets all the technology I need in my hands at the right price. Since the D300 just got introduced, people who have lots of money or people who think they need features that the D200 lacks would be strolling off with their new buys. I on the other hand have done my homework and am confident to say I don’t need those 3 or 4 bells and whistles for more than twice the price. Besides, I’m in Japan so I’m pretty confident when the tag doesn’t indicate any damage that the previous owner took care of this D200. Plus Japanese are known to be prone to upgrade quickly, so that’s good enough for me. 🙂
Edit: I just found out that my D200’s shutter actuations was only less than 28K when I bought it! Yippee!:D
Techno Tokyo Trip (Part 2)
 Well, so I was in Tokyo, THE big city of Japan.
First stop, of course, as the owner of this blog, has to be one of the key destinations in Tokyo, Akihabara Electric Town or Akiba for short. Well, actually, we were supposed to go to Tokyo Disneyland first but tickets were sold out so…
Anyway, it was just after Christmas, and right before New Year and me and my girlfriend’s 3rd Anniversary (yup, same day), so for a gift that can cover all three bases,
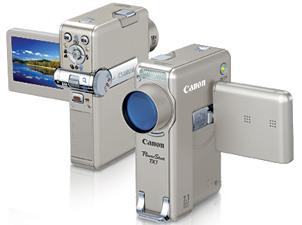
the Canon TX1 more than just handles that requirement, topping off even the Sony T70. Both had face recognition and image stabilization. It wasn’t an easy decision, with the ultra-sleek design and touch screen of the T70, and being cheaper by Y10,000 further compounded the difficulty of that decision. But ultimately, it came down to the nitty-gritty specs and practical capabilities of the Canon TX1 that subdued all the glitz and glamor of the T70. While it sounds cool to control your camera via a touch-screen LCD, it’s use was just not practical enough to replace solid physical controls, of which the TX1 has plenty. The TX1 not only had better optical zoom and larger optics, a separate video record button, the capability to record 16:9 videos, a solid body and a form-factor most suited for taking steady photos and videos. And while the LCD screen is smaller, it can however swivel around, useful when you’re shooting above your head, shooting yourself, or if you just need a mirror. Of course, the Y10,000 discount we got was certainly a big bonus and bumped the T70 out the window.:)
Aside from the TX1, I also bought myself my own Christmas/New Year/Anniversary present, but I’ll tell you more about it in my next post. For now, here’s a picture of Akihabara at night, taken from the TX1.
(Click on the thumbnail for the bigger picture)
The Kitchen and Your DS
 I recently had to go to Japan, and as as consequence forego the luxuries of having my meals cooked for me, which meant that I had to eat out for all my meals, which isn’t exactly cheap here, or learn to cook. And I had no experience with the latter. Ok, maybe I know how to boil an egg and fry some bacon. For those of you with the same opportunity that I have, Shaberu DS Oryouri Nabi (しゃべる DS お料理ナビ) comes to our rescue. Armed with a knife, a pot, and my DS in one hand (Ok, maybe not. You’ll find out why), I set out to try if I can really learn how to cook with this software.
 “Shaberu” has a total of 200 dishes, ranging from snacks to complete meals, Western or Oriental, and can even be filtered of ingredients you have to avoid, say, due to allergy or your doctor’s advice. And among the different dishes, Shaberu offers you different ways to search for a recipe. Of course, you have the basic option to browse the entire list, but you can also specify what ingredients you have, by set menus, keyword search, or by filters.
  Personally, I found the filter feature useful; I filtered for dishes that were easy to prepare and can be done in 10 minutes, but you can filter it for other criteria like calories as well. I decided I wanted seafood and picking one from the results, chose Clams Steamed In Wine.
There are 3 basic steps to do when cooking:
Prepare the ingredients and tools
In this step, you can choose how many people you’re cooking for, which automatically adjusts the shown amount of ingredients you will need. And you can also check off items you already have, like in a checklist, and Shaberu saves this data so when you turn on your Shaberu the next time you’re in the groceries, you’ll know exactly what to buy. Shaberu also tells you what tools are needed.
Go over the cooking process
Of course, before any cooking actually begins, you have to make sure you’re ready by reviewing each step of the cooking process, from preparation to finishing touches. You can of course skip this part if you wish.
Guided cooking
Here’s where the real fun begins, and where Shaberu, as well as the capabilities of the DS, shines. First of all, Shaberu means to chat in Japanese. Naturally, you can’t be holding your DS in one hand will you’re holding your pan and vigorously stirring with your spatula! Shaberu talks you through the dish so you don’t need to hold it. Just place it somewhere in the kitchen, preferably on a location where you won’t accidentally cook your DS, and listen to the instructions while you cook.
Although you can set the speed of the synthesized voice, for inexperienced cooks like me, I need a way to sort of pause it without having to touch my DS (specially not my touch screen) with my potentially dirty-from-handling-raw-food hands. Here’s where Shaberu’s show-stealer function comes in. Like I said, Shaberu means to chat, and chatting is a two-way thing. Using the DS’s mic, you talk to your DS to tell it to go to the next step, go back a step, repeat the step, and even to ask it for more details (Err, so how exactly do I clean these clams?). Of course, you can still navigate it with the touch screen if you so wish.
 After cooking the dish, Shaberu confirms if you were abe to successfully make it and celebrates with you with confetti while showing you how your dish should turn out. It also takes note of the dish that you cooked in its calendar, so you have a record of the dishes you’ve made so far.
Ok, now onto the Cons. As you might have probably guessed, Shaberu is a Japanese title. Naturally, it speaks Japanese and you can’t change languages. And even though Shaberu uses simple language, unless you’re well-versed in Japanese kitchen and food terms, or you have another DS running Rakubiki Jiten, you’re gonna have a bit of difficulty following the steps.
Overall, Shaberu makes full use of the multimedia capabilities of the DS to deliver a really effective cooking guide for both beginners and intermediate cooks alike. For expert cooks, I suggest going for the sequel of Shaberu, where you’ll be instructed by no less than 7 hotel chefs.
Social Bookmarks:
Little Speaker Cube
 I found this cute little Speaker Cube from Eiden, an electronics store in Japan, for Y2,980. It’s small and fits right in my palm (ok maybe a bit bigger). You turn it on via the top power button. It’s powered by USB, but you can also put in 4AA batteries. It can connect to any device with an audio jack, say your laptop or your Nintendo DS.
  However, I have to loosen the plug on my DS for it sound properly as in the picture. But I think this is more of a problem with the plug than anything else. Works perfectly on my laptop though. Also, the 2W stereo speakers don’t give enough oomph. It’s perfect when you just need decent, portable speakers. If you don’t have a laptop or PC nearby, you can also buy a wallplug to USB converter, perfect for plugging in your DS USB charger, and of course the speaker cube. With Wallplug USB, Nintendo DS, and Os Speaker @cube, you can take your music anywhere for picnics, hanging out, or other such social gathering.

[Edit] I later found out that it plugs fine on my Nintendo DS. The problem, actually, was that I didn’t plug it all the way in at the back of the speaker cube, nevertheless it still sounded fine on my laptop where I first tested it so I didn’t notice. Stupid!
Social Bookmarks:
Replacing My Asus L3H’s Memory (or What TO DO When You Buy New Stuff)
A week ago I bought another 512MB RAM for my laptop, since the other 512MB RAM I brought with me was not working properly. From the lessons that I learned since my last post (What NOT To Do…), I installed and tested the memory as soon as I got home. As before, the 256MB memory that came with my notebook was installed in the back slot, and I couldn’t figure out how to get to the top slot. So I took out the 256MB, stored it, and put in the 512MB memory.
After searching through the AsusTek forums, I found out how to remove the keyboard from Joel’s corner.  All I needed to know was one screw — the one beside the motherboard fan — was needed to be removed before I could remove my keyboard. Unfortunately,
 my pen screwdriver was too short to reach that darn screw. Not to worry though, I brought my handy pocket knife.

 With that screw out of the way, next step is to remove the front panel. Switching the screwdriver on my pen screwdriver to the smallest ‘driver, I push the front panel release, and afterwards,
  I slide the keyboard up and away, revealing the memory slot compartment. In the upper-right corner I also noticed the miniPCI WiFi compartment, available in the L3C. Of course,

my L3H only had an empty compartment, but now I know that I can possibly buy and put in a miniPCI WiFi card.
The memory slot is covered by a metal plate, held by one screw, which we promptly remove to reveal that slot. Now we go on to actually putting in the memory, which is a simple process of sliding the memory firmly into the slot

(I had to exert quite a bit of effort as the memory wouldn’t go in at first), and then push down until you hear the click of the locks. (more…)


Recent Comments